Intro to GitHub and Markdown
Quick inks to lessons on this page
- Introduction
- Using GitHub
- Create and manage a repository
- Learning Markdown
- (optional) Adding scientific symbols and equations
- (optional) Creating webpages with GitHub Pages
1. Introduction
This page outlines and demonstrates the activities that you should complete prior to creating your submission for your first individual assignment (Climate Claims).
In this tutorial, you will learn how to use GitHub and Markdown together to:
- Document your work, store your files and code, and share content with collaborators and the public.
- Keep track of version changes to your documents and code; restore previous versions, if necessary.
- Format text for the web easily using Markdown.
- (optional) Create and publish a webpage that documents your work in this module with only a minimal amount of HTML knowledge.
- Complete your individual assignments
1.1 Learning objectives
By the end of this tutorial, you will be able to:
- Create a GitHub repository (from scratch and by cloning/forking an existing one)
- Create, edit, and manage versions of files in a GitHub repository
- Describe the basics of versioning and versioning software; communicate their value
- Use Markdown to format text in a simple yet effective manner
- Bonus: Use GitHub Pages to create simple static web pages using jekyll
- Identify where you can find more information to experiment and learn on your own
1.2 What is GitHub? How does it relate to this course and science?
- Watch the following video “What is GitHub?”
- Watch Jay’s introductory video
1.3 Create a GitHub account (if you don’t have one)
- Navigate to GitHub and sign up for an account if you don’t already have one.
- After registering, sign in to your account.
1.4 Connect your GitHub account with our GitHub Classroom
We will use GitHub for all individual assignments in this project, using a tool called GitHub Classroom. At the beginning of the assignment, jay will provide you a link to create your personal assignment repository (pre-populated with guidance material); you will do your work in this repository and its contents will be evaluated as your assignment submission. You will not submit any of your individual assignments through Avenue.
To enable this, you must connect your GitHub account with your name in our project classroom. This will be done in the next lesson.
2. Using GitHub
2.1 Lesson objectives
- Create a GitHub repository by cloning an existing one.
- Get familiar with the interface and common terminology
- Create folders and files.
2.2 Clone a repo; Connect your GitHub account to GitHub Classroom
- Click this link to clone the repository for this module. Cloning allows you to make a personal copy of someone else’s repository (Jay’s in this case), so that you can pick up where they left off.
-
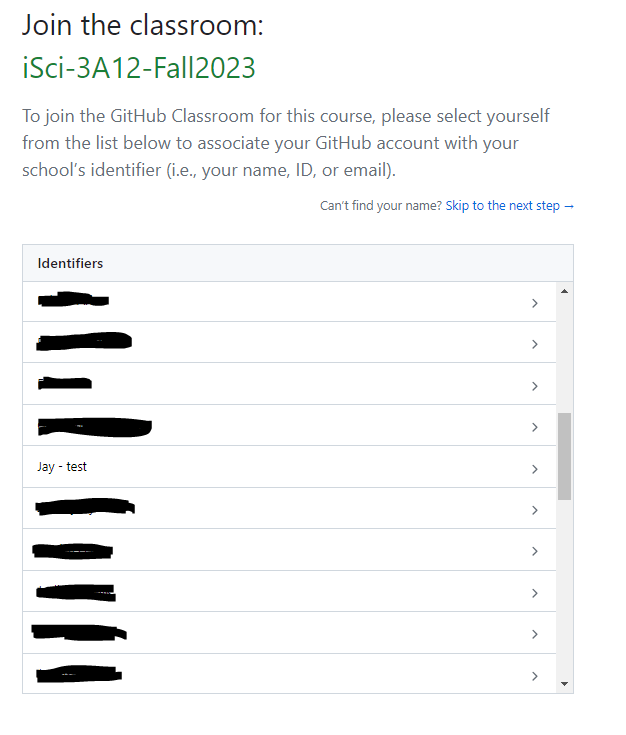
If this is the first time you’ve used this link, you’ll first be prompted to connect your GitHub account to your name in our GitHub Classroom.

- New and fun for 2025: Due to changes in McMaster’s GitHub policy, you will not be able to accept the assignment immediately and will see an error message if you do so. The following steps are now required:
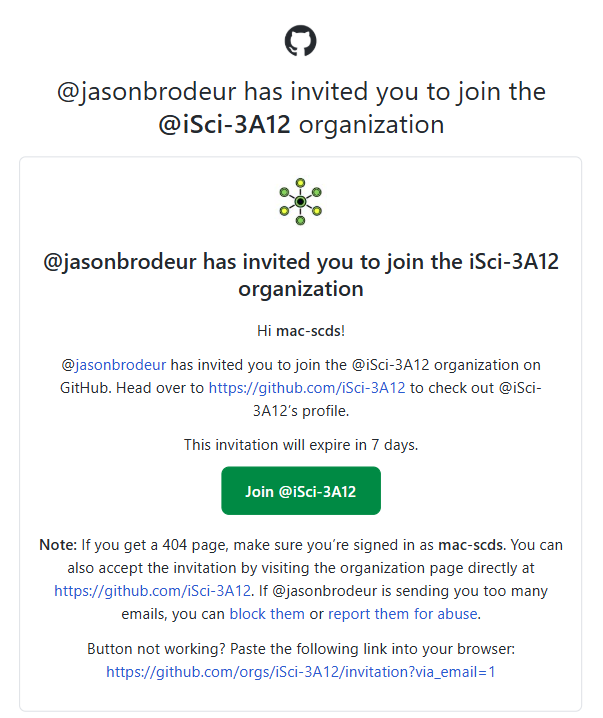
- After you’ve linked to your account, Jay will invite you to the iSci3A12 GitHub organization. You will receive an email that looks like the following: -

- Accept the invitation and try again to accept the assignment using this link.
- After you’ve linked to your account, Jay will invite you to the iSci3A12 GitHub organization. You will receive an email that looks like the following: -
-
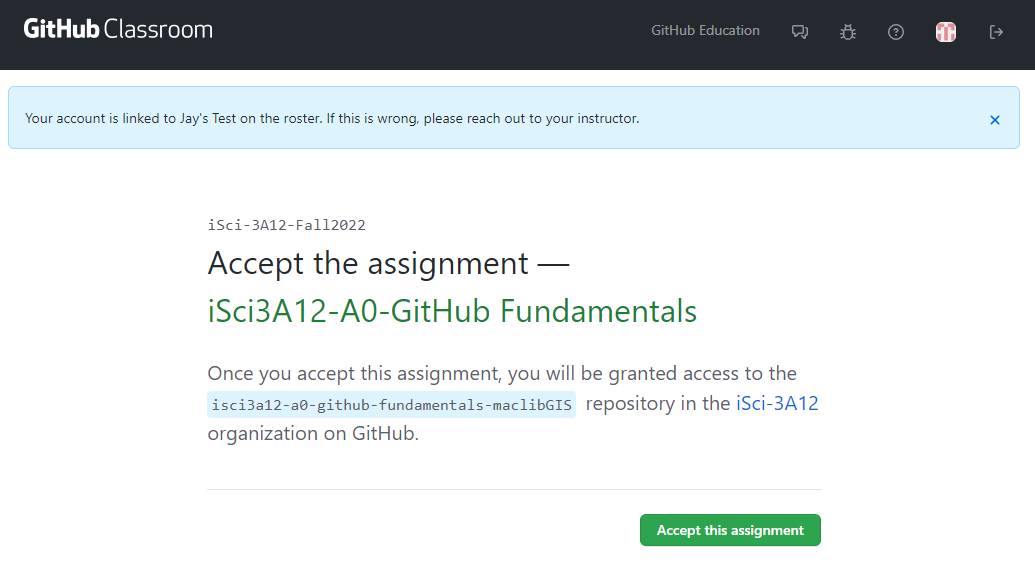
In the following window, select to accept the assignment.

- When the you’re ready to go screen appears, click the link to go to your repository. Rather than being created in your GitHub account, this repository is created in the iSci-3A12 organization (though you have edit rights to it). Your repository URL will be of the form:
https://github.com/iSci-3A12/isci3a12-a0-github-fundamentals-<yourGitHubUsername> - Important Note: For reasons unknown to me, your GitHub Classroom repositories won’t show up in your GitHub account’s repository list. If you want to see all of your assignment repositories, go to https://github.com/settings/repositories.
2.3 Follow along with Jay’s introductory video
Here, Jay will demonstrate the steps laid out above, and explain some of the features within a GitHub repository.
2.4 Work through the introduction in your repository’s README.md file
Read through the introduction provided in the Markdown document README.md in your new repository. This will provide a basic introduction on working with GitHub repositories.
3. Create and manage a repository
3.1 Lesson objectives
In this lesson, you will learn to:
- Create a new GitHub repository from scratch
- Create files and folders
- Edit a text file; commit changes
Video
3.2 Create a new GitHub repository
As explained in the previous lesson, a repository is a container for related materials (i.e. folders and files), that allows for them to be managed (stored, version-tracked) and shared. Usually, you create a separate repository for each project that you are working on. Here are the New York Times’ GitHub repositories, for example.
- From your GitHub main page, click on the green New Repository button. This is the repository (storage location) where the content of your website will be hosted.
- Provide a name for your repository. The name you enter will determine the URL of your repository.
- i.e.
https://github.com/<your-github-username>/<your-repo-name> - e.g.
https://github.com/jasonbrodeur/test-pages
- i.e.
- Provide a name for your repository. The name you enter will determine the URL of your repository.
- Check the box to Initialize this repository with a README
- NOTE: Your README file is a plain text file (same as a .txt file) that typically contains descriptive information about your repository (Who made it? What does it contain? What is it for?, etc.). The
.mdextension indicates to GitHub that this is a Markdown file (more on that later). One of the nice features of markdown files is that they are readable by almost any applications (and humans), since they are mostly just plain text files.
- NOTE: Your README file is a plain text file (same as a .txt file) that typically contains descriptive information about your repository (Who made it? What does it contain? What is it for?, etc.). The
- Click the Create repository button
- Your browser will now open to the top-level page of the repository. Your repository will contain one file: README.md.
3.3 Create a folder and a text file within it
In this task, you’ll create a folder and learn how to create and edit files within it. These files will be used to make a webpage in a later (optional) step.
Your task is to create a folder named docs in the top level of the repository. This is where the web page content will live. We also want to create a file in this folder called index.md. This will be the home page for your website.
- In the top-level repository page, click Create new file
- In the Name your file… box, enter
docs/index.md. Click Commit change. You will now have a folder nameddocsin your repository with a file namedindex.md.- NOTE1: To create a file, simply enter the desired name and file extension.
- NOTE2: To create a folder, you need to add a trailing slash (/) to the name.
- NOTE3: GitHub doesn’t let you create an empty folder, so you need to create at least one file within the folder. If you ever need an empty folder, you can create a dummy file and delete it later.
3.4 Edit your text file
- Click on the
index.mdfile to open it in the file viewer page- On the file viewer page, click the edit button (pencil icon) to switch to editing mode
- Add a bit of text to this file (anything is fine for now).
- When finished editing, scroll to the bottom of the page to the Commit changes box.
- NOTE: The Commit changes box is used to record information about changes before you commit them.
- (optional) If interested, modify the comment from Update index.md to something more descriptive
- (optional) Add a description, if desired
- Click the Commit changes box to finalize your commit. Your changes will be represented in the file.
- NOTE: The Commit changes box is used to record information about changes before you commit them.
3.5 View your change history
- In the
index.mdfile viewing page, explore the Blame and History buttons to better understand how GitHub keeps track of file changes.
4. Learning Markdown
One of the really nice things about GitHub (and GitHub Pages, which you’ll learn about later) is that you can use Markdown to format text on a web page without the use (or knowledge!) of HTML coding. This makes it really easy to create content. In this section, you’ll learn a bit more about Markdown and how to use it to create formatted text.
4.1 Lesson objectives
- Learn about Markdown
- Practice creating web-ready content with Markdown
Video
4.2 What is Markdown?
Borrowed shamelessly from Github’s Mastering Markdown page:
Markdown is a way to style text on the web. You control the display of the document; formatting words as bold or italic, adding images, and creating lists are just a few of the things we can do with Markdown. Mostly, Markdown is just regular text with a few non-alphabetic characters thrown in, like # or *.
Markdown uses simple notation to apply simple formatting rules. Since it’s pretty much just plain text, it’s transferable and much simpler than marked-up text like HTML or even Word or Google documents. It’s also very readable in its plain text format, which is nice. For much of the writing that you do for the web, Markdown is good enough. Github uses Markdown for its documents (this document was created in markdown), as does a variety of other web platforms (Reddit and Trello, as examples).
4.3 Add front matter to index.md
- Open your
index.mdfile for editing. Remove any text that was in there from Lesson 1. - Using the GitHub editor, copy the text below and paste it at the top (including the dashes):
---
title: <enter your title here>
layout: default
nav_order: 1
---
- Commit your changes. Your text will look kind of weird when you preview the page, but this header text will be used in the next lesson when we create a webpage (and website) from Markdown documents. These provide GitHub Pages with the information necessary to present the page properly in the website you will create later.
4.4 Use Markdown to add content to index.md
Using the Mastering Markdown guide (or other guides you find on the web) as a reference, enter text beneath the header to create a fictional document that contains most of the following elements:
- Headings of a number of different levels
- bolded, italicized text
- insert an image from the web
- insert an image that is hosted in your GitHub repository
- An ordered list
- A bulleted list
- A link to another website
- A snippet of code
- A table
- And finally, an emoji!
Commit your changes and enjoy the products of your hard work!
4.5 Some Notes
- Use the Preview changes tab to see (mostly) how it will look on your page.
- Markdown doesn’t add new lines to a document in the same way as a document editor like MS Word. Sometimes you might hit enter to start a new line in the editor, only to find that it has been added to the first paragraph when rendered. To avoid this you can try one of the following:
- Enter an extra blank line
- Leave two blank spaces at the end of the sentence (this is interpretted as the end of a paragraph)
- Insert the HTML tag
<br>to create a break line in the rendered text. You can use multiple to create more blank lines.
4.6 More information and references for Markdown:
5. (optional) Adding scientific symbols and equations
In this lesson, you will learn how to create and insert scientific symbols and equations into Markdown documents using HTML. While the simplicity of Markdown is usually an asset, there are times when you need to present text using more complex formatting–for example, when using symbols and equations. Thankfully, Markdown documents accommodate HTML, so whenever you hit a limitation with it, you can use HTML instead. This involves a bit more technical skill, but it’s something that you can figure out pretty quickly with the help of Google.
5.1 Symbols
The W3schools HTML Symbols reference page is the best place to go for comprehensive instruction on adding symbols using HTML. It also provides a variety of symbol lists for easy reference.
As discussed in the previous resource, you can use an entity name or an entity number to create a symbol. For example, to create the alpha symbol, you can do either of the following:
- Entering the entity name
αwill print the symbol α, OR - Entering the entity number
αwill print the symbol α
Note: Don’t forget the semicolon at the end of the code!
5.2 Subscripts and superscripts
Subscripts and superscripts can be created by putting placing the following HTML tags before and after the desired numerals/symbols:
- For subscripts, place
<sub>in front and</sub>after the character(s) you would like to subscript.- e.g.
H<sub>2</sub>Oproduces H2O
- e.g.
- For superscripts, place
<sup>in front and</sup>after the character(s) you would like to superscript.- e.g.
δ<sup>18</sup>Oproduces δ18O
- e.g.
5.3 Single-line equations
Single-line equations can be created by combining symbols and sub/superscripts as required.
- e.g.
h<sub>θ</sub>(x) = θ<sub>o</sub> x + θ<sub>1</sub>xproduces hθ(x) = θo x + θ1x
5.4 More complex equations (in case you’re interested)
If you require a more complex equation, it’s probably easiest to insert the equation as an image. There are some interesting ways to do this dynamically using Latex if you’re interested in exploring. You can find more information on these approaches in this Stack Overflow answer.
5.5 Create a new Markdown page containing symbols and an equation
- Create another markdown page in the
docsfolder. Name it as you wish, but ensure that it ends in.md. As done earlier, add a header with a title. Set nav_order value to 2 (this will inform GitHub Pages to make this the second menu item in your website), as shown below:
---
title: <enter a different title here>
layout: default
nav_order: 2
---
- Finally, add a sentence with a symbol or two and include a relatively simple equation. You can try the Stephan-Boltzmann law, as an example.
6. (optional) Creating webpages with GitHub Pages
In this optional add-on exercise, you’ll learn how to use GitHub Pages to turn the markdown content in your GitHub repository into a functioning webpage.
Follow along with the lesson provided by the Sherman Centre for Digital Scholarship.
7. Learn more about git, GitHub, GitHub Desktop
If you’re interested in learning more about how you can do version control in your local folders and connect them to GitHub repositories see:
- This intro to GitHub and GitHub Pages tutorial from the Sherman Centre for Digital Scholarship.
- This intro to GitHub Desktop tutorial from GitHub.